| SL NO |
Description |
| 1 |
How to give local IP for devices?
Open Command Prompt (Windows + R → type cmd → Enter) or Terminal on Mac. Run ipconfig /all (Windows) or ifconfig -all (Mac), note IPv4 Address, Subnet Mask, Default Gateway, Primary DNS, Secondary DNS. Run arp -a, choose an unused IP to avoid conflicts.
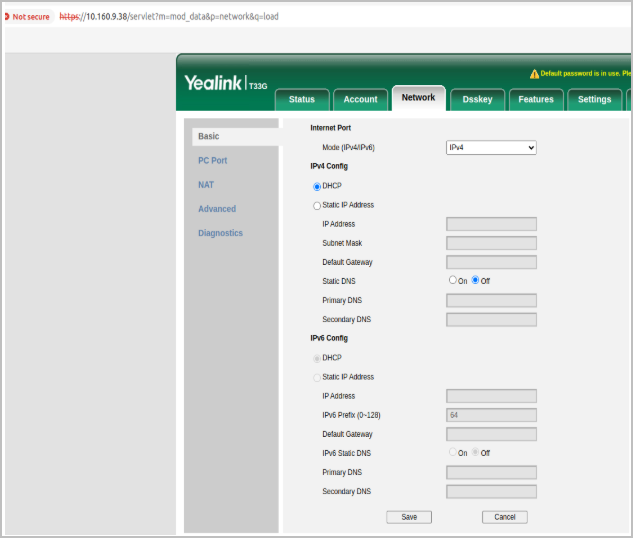
Yealink phones:
Open a browser, enter Yealink phone's IP address, log in (default: username/password = admin). Go to Network → Basic, set IPv4 to Static, input: Static IP, Subnet Mask, Default Gateway, Primary DNS, Secondary DNS. Click Save or Confirm.
For Yealink Cordless phones:
- On the handset, press the Menu button.
- Navigate to Settings → System Settings → Network Settings.
- Enter the admin password.
- Select IPv4 → Static IP.
- Input the required details: Static IP, Subnet Mask, Default Gateway (refer to Block "100" for necessary information).
- Save the settings and restart the base station if prompted.
Polycom phones:
- Press the Menu button.
- Navigate to Settings → Advanced (default password: 456 or admin if set).
- Select Network Configuration or IP Address Configuration.
- Choose Static instead of DHCP.
- Enter the following details:
- IP Address
- Subnet Mask
- Gateway
- DNS Servers (optional)
- Save and reboot the phone.
|
| 2 |
DHCP 66
-
Check with the Practice IT Team: Confirm with the practice’s IT team whether DHCP Option 66 is enabled.
-
If No IT Team or Unknown: Follow the steps below to check DHCP Option 66.
- Open Command Prompt (Windows + R → type cmd → Enter).
- Run ipconfig /all to find the DHCP Server IP address.
- Download the tool dhcptest.exe (a small DHCP testing utility).
- Open Command Prompt, navigate to the folder with dhcptest.exe, and run:
- dhcptest -s <DHCP Server IP>
- Look at the output for Option 66, which will display the TFTP server or provisioning URL.
|
| 3 |
Router Restart:
- Inform the practice about the network downtime.
- If there’s a server setup, do not restart the router. Contact the IT team for assistance.
- Always consult the IT team before making router changes, if available.
- For restarts (only if permitted):
- Turn off the router (use the power button).
- Wait 15-30 seconds.
- Turn it back on (or replug the cable).
- Phones should unregister and re-register automatically.
|
| 4 |
How to find the public IPv4 address? https://whatismyipaddress.com/ |
| 5 |
Check for IP ban and whitelist:
|
| 6 |
How to check the IPv4 of a device?
Yealink device: OK →Status →IPv4 address
Polycom device:
- Press the Home button.
- Navigate to Settings.
- Select Status.
- Go to Network → TCP/IP Parameters.
Look for IPv4 Address (e.g., 192.168.1.10).
|
| 7 |
How to connect the device with WiFi? (For both Yealink and Polycom phones)
Go to:
- Settings → Basic Settings → Wi-Fi
or
- Settings → Network → Wi-Fi
(NB: Not all yealink device supports WiFi)
- T54W
- T57W
- T53W
- T58A (when updated with the latest firmware)
- VP59
- SIP-T48U (Wi-Fi via WF50 or WF40, but advanced with latest firmware)
- Yealink CP960 (conference phone, supports Wi-Fi with firmware or adapter)
- Yealink MP Series (Microsoft Teams Phones)
- MP54, MP56, MP58 (built-in or USB-based Wi-Fi, varies by firmware)
|
| 8 |
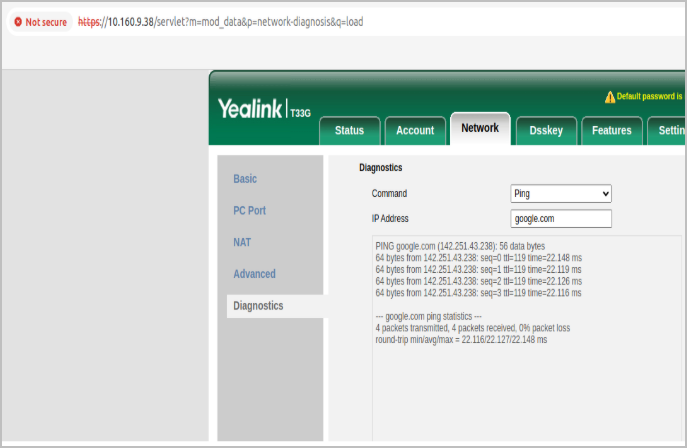
Ping Test:
Yealink:
Login to the admin web console Go to Network →Diagnostics →Command: PIng→ IP address →google.com
Polycom:
Login to the admin web console - Once logged in, go to: Utilities → Diagnostics
(some models may use: Settings → Diagnostics)
- Look for the Ping Test section
|
| 9 |
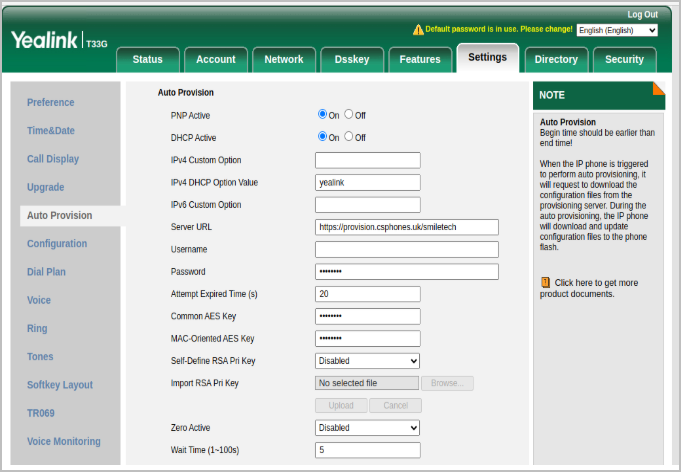
Check for provisioning URL in admin webconsole:
Yealink:
Settings →Auto Provision → Sever URL → If any changes are made in the server URL, click onto Save and then Auto Provision Now
Polycom:
- Go to Settings → Provisioning Server
- Look for:
-
Server Type (HTTP, HTTPS, FTP, etc.)
Server Address (this is the server URL)
|
| 10 |
How to access the admin web console?
Yealink:
Take the IPv4 address of the device from the Status option. Login to the admin web console by using the IPv4 address (Username & Password: admin)
Polycom:
Take the IPv4 address of the device from the Menu → Settings → Status → Network → TCP/IP Parameters Search for the device IPv4 address Login with username: admin & password: 456 (default, may be changed by your admin)
|
| 11 |
Changing Subnet Mask to Broaden Connectivity
- Open Command Prompt (Windows + R → type cmd → Enter) or Terminal on Mac.
- Run ipconfig /all (Windows) or ifconfig -all (Mac) and note the IPv4 Address, Subnet Mask, and Default Gateway.
- Compare the subnet masks for your computer and phone to check if they are in the same network.
If the Subnet Mask Needs to Be Broadened:
-
Access Command Prompt as Administrator
- Right-click on Command Prompt → Run as Administrator.
- Modify Subnet Mask
Run the following command:
netsh interface ip set address "WIFI NAME" static <Your Computer IP> 255.255.0.0 <Your Gateway IP>
- Replace <Your Computer IP> and <Your Gateway IP> with the respective values.
-
Verify the Change
- Run ipconfig to confirm that the subnet mask now reads 255.255.0.0.
-
Test the Connectivity
- Run ping <VoIP Phone IP> to check if the computer can now communicate with the phone.
Reverting to Original Subnet Mask
-
Restore the Subnet Mask
Run this command:
netsh interface ip set address "WIFI NAME" static <Your Computer IP> 255.255.255.0 <Your Gateway IP>
- Switch to DHCP (Optional)
To let the network automatically assign an IP:
netsh interface ip set address "WIFI NAME" dhcp ipconfig /renew
Notes
- This change is temporary and intended for troubleshooting. Revert to the original settings once the task is complete.
- Ensure the phone is powered on and connected to the network during this process.
- If issues persist, check the physical connections or consult the network administrator.

Current Wi-Fi Configuration (based on your screenshot):
-
Wi-Fi Adapter Name: Wi-Fi
-
IPv4 Address: 10.160.13.186
-
Subnet Mask: 255.255.254.0
Default Gateway: 10.160.12.1
|

Comments
0 comments
Please sign in to leave a comment.